WordPress Security is just another part of long-term blog maintenance.
Most hacks happen because a blogger forgot a tiny little thing — an update, a plugin, a weird leftover theme — and boom. Rankings drop, traffic evaporates, malware takes a scenic tour through your content.
But relax, you do not need to be a security analyst, a programmer, or a cyber-warrior with caffeine-induced superpowers.
So let’s secure your little corner of the internet so you never wake up to “Why is my homepage redirecting to a crypto casino??” lol.
Why WordPress Security Matters for Long-Term Blog Growth

Security isn’t a “nice to have”; it directly impacts your:
- Traffic (Google hides hacked sites faster than I hide my snack drawer from myself)
- Rankings (malware = tanked SEO)
- User trust (no one wants to be redirected to Russian TikTok clones)
- Site uptime (a hacked site is often offline or heavily slowed)
A secure blog = a fast, stable, long-lasting blog.
This is maintenance — not paranoia.
Important Note:
Before making any security changes to your WordPress site, always perform a full backup using a plugin like Solid Backups.
If your hosting provider offers automated backups (like DreamPress does), double-check that the latest backup has been created before you begin.
WordPress Security Checklist
1. Choose (Or Migrate to) a Managed Web Hosting
Your hosting provider has a massive impact on your website’s security. Even if you follow every best practice, your site can still be vulnerable if the server isn’t protecting you.
That’s where DreamHost’s managed WordPress hosting, DreamPress, makes a big difference.
DreamPress strengthens your WordPress security by offering:
- Automatic WordPress updates — prevents vulnerabilities caused by outdated versions.
- Daily backups — ensures you can quickly restore your site if anything goes wrong.
- Built-in server-level firewall — blocks malicious traffic before it ever reaches WordPress.
- Real-time monitoring — detects suspicious activity and potential threats 24/7.
- Free SSL certificate — encrypts all data between your site and users.
- Isolated resources — prevents other websites on the server from affecting yours.
- Expert WordPress support — ideal if you’re not technical or don’t want to manage security yourself.
Most WordPress breaches happen due to outdated software, weak hosting security, or misconfigured servers.
DreamPress automatically addresses many of these issues, giving your site a safer, more reliable foundation.
2. Replace the Default WP-Admin User
When WordPress is pre-installed by your hosting service, it often creates a default Admin account.
This account usually uses your blog name as the username, which hackers can easily guess, especially if your password is weak.
(Why such a stupid security breach is still a thing in 2026, I will never know.)
To protect your site, create a new user account with Administrator privileges and delete the default one.
Steps to create a new Admin account:
- Log in to your WordPress Dashboard as the current Admin.
- Go to Users > Add New.
- Fill in the details (use a different email) and set the Role to Administrator. Save.
- Log out and log in with the new Admin account.
- Navigate to Users > All Users, hover over the old Admin, and select Delete.
- Reassign all posts from the old Admin to the new account to avoid losing content.
Pro tip: Use a long, complex username – avoid your real name or pen name. Combine words, symbols, or random letters to make it hard to guess.
3. Hide Author Usernames by Changing the Author Slug / user_nicename
By default, WordPress exposes your login username through the author slug in URLs.
For example:
websitename.com/author/authorusername
If your login username is visible here, hackers can target it in brute-force attacks.
You can easily change your username while keeping a public pretty name (with ZERO login value) with this tiny free Edit Author Slug plugin.
4. Add the Recommended HTTP Security Headers
HTTP (HyperText Transfer Protocol) Security Headers are your website’s palace guards.
Steps to add the main HTTP headers on Apache:
- Log in to your hosting cPanel.
- Navigate to Websites > FTP Users & Files (the name may vary by host).
- Select Manage Files and open
.htaccessunder your website folder (e.g.,yourwebsite.com). - Scroll to the bottom, skip a line, and add the following code:
# Security Headers
<IfModule mod_headers.c>
    Header always set Strict-Transport-Security "max-age=31536000; includeSubDomains; preload" env=HTTPS
    Header always set Content-Security-Policy "upgrade-insecure-requests"
    Header always set X-Content-Type-Options "nosniff"
    Header always set X-XSS-Protection "1; mode=block"
    Header always append X-Frame-Options SAMEORIGIN
</IfModule>
# End Security Headers- Save the file and close the editor.
For NGINX users:
Just email your hosting customer support and ask them to do the job for you.
You’ll have all the headers properly set up on the same day.
5. Disable Directory Listing / Directory Browsing
Directory Listing (or Directory Browsing) exposes an index of all files in a folder on your website. Hackers can use this to locate sensitive files and exploit vulnerabilities.
You can test this by visiting:
yourwebsite.com/wp-includes/cssIf you see a list of files, your site is vulnerable – scary, right?
Steps to manually disable Directory Browsing:
- Log in to your hosting cPanel.
- Go to Websites > FTP Users & Files and open Manage Files.
- Open the
.htaccessfile under your website folder (e.g.,yourwebsite.com). - Scroll to the bottom, skip a line, and add:
Options -IndexesSave the file. Check by visiting yourwebsite.com/wp-includes/css. If done correctly, your browser should display your site’s default 404 Not Found Page instead of a file list.
If you’re on managed hosting, this is probably disabled by default.
Email your hosting support to be sure.
6. Disable File Editing to Improve WordPress Security
By default, WordPress allows Administrators to edit plugin and theme files directly from the Dashboard.
While convenient, this poses a serious security risk:
- Accidental changes by an Admin could break your site.
- If a hacker gains access to an Admin account, they could manipulate your code and steal sensitive data.
The simplest and safest way to prevent this is to disable file editing using the Solid Security plugin.
You can temporarily re-enable it if necessary, but it’s best to keep it off.
How to Disable File Editing via Solid Security / SolidWP:
- Log in to your WordPress Dashboard as Admin.
- Navigate to Security > Advanced (bottom left).
- Under System Tweaks > WordPress Tweaks, select Configure Settings.
- Check the Disable File Editor checkbox.
- Save changes.
With file editing disabled, your site is significantly more secure against accidental or malicious code changes.
7. Prevent PHP Direct Execution in Sensitive Directories
Hackers often target sensitive WordPress directories like wp-content, wp-includes, or even the .htaccess file in your root folder.
If they gain access, they can upload malicious code and execute it remotely – potentially taking down your entire site.
To improve the security of your WordPress site, one of the most effective strategies is to disable PHP execution in these vulnerable directories.
How to prevent PHP direct execution via Solid Security:
- Install the Solid Security (SolidWP) plugin if you haven’t already.
- Log in to WordPress as an Administrator.
- From your Dashboard, select Security → Advanced.
- Under System Tweaks, enable all the PHP Execution options:
- Disable PHP in Uploads
- Disable PHP in Plugins
- Disable PHP in Themes
- Save your settings.
This single step can drastically increase the security of your WordPress website and block a common attack vector.
8. Limit Password Guessing Attempts
Password guessing, or brute force attacks, is one of the most common ways hackers try to break into WordPress websites.
Automated bots attempt millions of password combinations until they get it right – unless you stop them.
A simple way to improve WordPress website security is to limit the number of login attempts. This ensures hackers and bots can’t endlessly test passwords until they succeed.
How to limit login attempts with Solid Security:
- Install the Solid Security plugin if you don’t have it yet.
- Log in as an Administrator.
- From the Dashboard, select Security → Configure → Lockouts.
- Under Local Brute Force, set:
- Max Login Attempts Per Host
- Max Login Attempts Per User
- Choose a time limit under Minutes to Remember Bad Login.
- Save your settings.
⚠️ Tip: Don’t set the maximum login attempts too low – you don’t want to lock yourself out if you mistype your password once or twice.
9. Moderate Comments for Advanced WordPress Security
By default, you should never allow comments on your blog posts to be automatically approved. As your site traffic grows, spam activity in the comments section will inevitably increase.
Spam comments usually contain malicious links that put both your site and your visitors at risk.
How to set comments to moderation mode in WordPress:

- Log in as an Administrator.
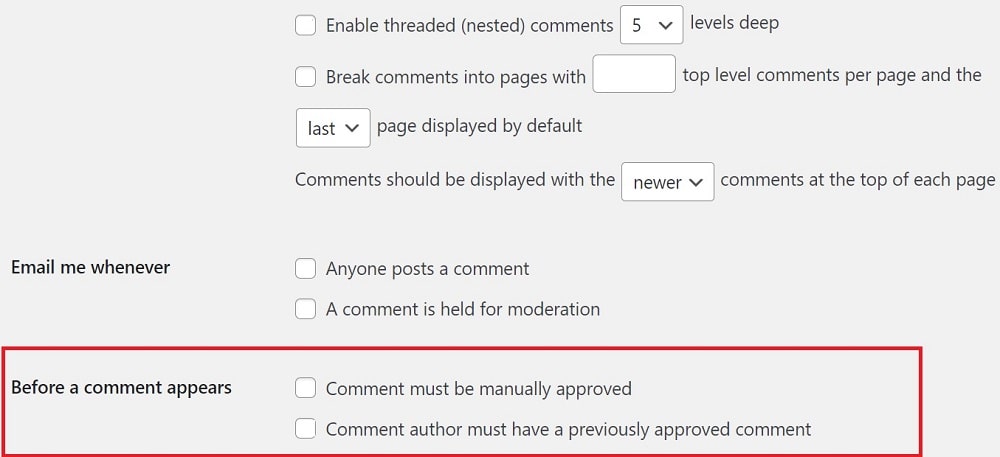
- Go to Settings → Discussion in your WordPress dashboard.
- Scroll down and check:
- Comments must be manually approved
- Comment author must have a previously approved comment
- Adjust additional preferences as needed, such as whether to allow link notifications (pingbacks/trackbacks) or which email alerts you’d like to receive.
- Save your changes.
Tips for safe comment moderation to improve WordPress security:
✅ Use a spam-blocking plugin. A tool like Hide My WP can automatically filter spam, save you time, and add extra protection. It not only reduces spam but also hides your WordPress site from theme detectors and attackers.
🚩 Watch out for generic praise. Comments like “This is the best article I’ve read in this field, great job!” may look flattering but are often spam. If the feedback is vague and not specific to your content, treat it as suspicious.
By moderating comments, you not only protect your readers but also increase the security of your WordPress website without adding much technical complexity.
Is WordPress Security Really That Hard?
Nope. It’s genuinely simple once you stop imagining it’s a hacker movie plotline.
Security = maintenance.
Maintenance = long-term blog growth.
And you’re already working through Sub-Pillar #5, so this fits beautifully into your new blog structure.
You’re not “doing tech.”
You’re just taking care of your business.
Improve WordPress Security FAQ
Yep. WordPress is targeted constantly because it’s popular. One good plugin gives you firewall protection, scans, and login security automatically.
Absolutely — if you follow basic maintenance steps. The danger isn’t WordPress itself; it’s neglect.
Yes. Cheap shared hosting = more sites on the same server = higher exposure to vulnerabilities. Good hosting dramatically reduces risk.
Stay calm. Then:
→ Contact hosting support
→ Run malware scans
→ Restore a clean backup
→ Change all passwords
→ Install/review your security plugin
Prevention is cheaper than cleanup — like, WAY cheaper.
Conclusion
Securing your blog is not scary, not technical, and not something you need to procrastinate for six months. These small steps keep your site fast, stable, protected, and ranking consistently.
And honestly? Long-term blog success is 50% content strategy and 50% “don’t let your site fall apart.”
You’ve got this.
Now that your site isn’t a security liability, let’s make sure its foundation is strong too.
→ Head back to my 2026 Blog Planning Master Guide to double-check your setup, structure, and technical basics before scaling.


4 Comments